# QuickTime Screen Recording With Audio: How to Record Sound on Mac
> QuickTime records your microphone but never your Mac's system audio. Here is how to get sound into a QuickTime screen recording, why the Aggregate Device trick fails, and what to use instead.
**Author:** Johnny
**Published:** 2026-08-19
---
If you have opened QuickTime, started a screen recording and played it back to silence, nothing is broken. QuickTime records a microphone and only a microphone — and only if you select one first, because it defaults to None. The sound your Mac itself is playing, which is what most people mean by "screen recording with audio", is something macOS has never let QuickTime capture.
That distinction is the whole problem, and it decides which fix you need. This guide covers both: getting your voice into a QuickTime recording (about ten seconds), and getting your Mac's own audio into one (a free virtual audio driver and a few minutes in Audio MIDI Setup). It also covers why the popular Aggregate Device trick for capturing both at once quietly fails.
Everything below is written for macOS Ventura (13) through macOS Tahoe (26).
## Quick answers
| What you want to record | Can QuickTime do it? | How |
| --- | --- | --- |
| Your microphone | Yes | Options → Microphone → pick your mic |
| Your Mac's system audio | Not natively | Route it through [BlackHole](#how-do-i-record-system-audio-in-quicktime) |
| Mic and system audio together | No | [Needs a different recorder](#can-quicktime-record-your-microphone-and-system-audio-at-the-same-time) |
| Audio only, no screen | Yes | File → New Audio Recording (⇧⌘N) |
| Both as separate, editable tracks | No | [Tella](/mac) records them independently |
## Does QuickTime screen recording record audio?
It records a microphone, and only if you choose one before you start. There are two completely different kinds of audio in a screen recording, and QuickTime handles exactly one of them.
**Microphone audio** is your voice, picked up by a mic. QuickTime records this happily, once you select the mic.
**System audio** — also called internal audio, computer audio or desktop audio — is the sound your Mac is producing: a video playing, a call, a game, a product that beeps. QuickTime cannot record this. There is no setting for it, and there never has been.
You can see both facts in one place. In QuickTime, choose **File** → **New Screen Recording** and click **Options**:
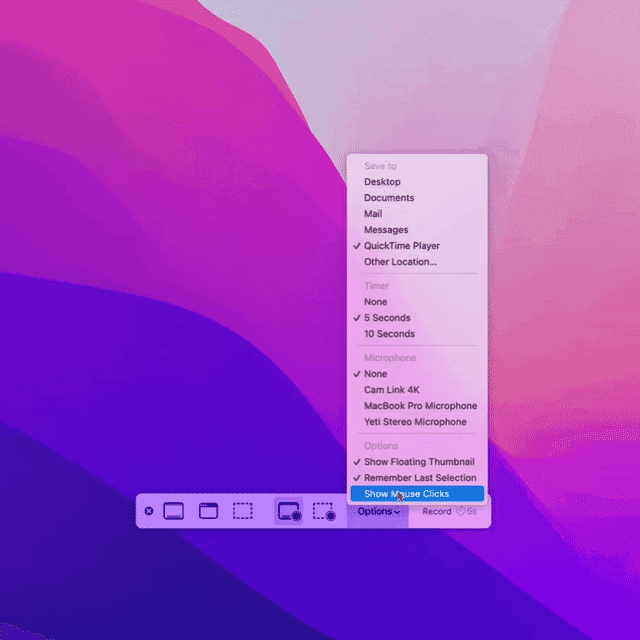
The **Microphone** section lists input devices and nothing else, and it is set to **None**. That default is why so many QuickTime recordings come back silent. There is no entry anywhere in this menu for the audio your Mac is playing, on any version of macOS — Tahoe 26 added window-specific recording and HDR capture to this toolbar and still did not add system audio.
One thing worth knowing before you go looking for the old interface: since macOS Mojave, **File** → **New Screen Recording** does not open a QuickTime window at all. It hands you the system Screenshot toolbar, the same one ⇧⌘5 opens. Apple's own documentation describes it that way. Guides that tell you to click a red Record button inside a QuickTime window are describing an interface that has not existed for years.
## Why is there no audio on my QuickTime screen recording?
Work down this list — they are ordered by how often each one is the actual cause.
- **Microphone was set to None.** This is the overwhelming majority of cases. Open **Options** before recording and pick your mic under **Microphone**. Do not assume it stuck from last time; check it every recording.
- **You expected system audio.** If your voice recorded fine but the video you were playing is silent, no setting will fix it. Skip to [the BlackHole section](#how-do-i-record-system-audio-in-quicktime).
- **macOS is blocking the mic.** Go to **System Settings** → **Privacy & Security** → **Microphone** and confirm QuickTime Player is switched on. A denied permission produces a recording with a silent audio track rather than an error.
- **You were wearing headphones.** If you were relying on your microphone to pick up sound from your speakers, headphones send that sound into your ears instead and the mic hears nothing. This is the same problem as system audio in disguise, and it has the same fix.
- **The wrong input is selected.** A Mac with a capture card, an audio interface or a virtual driver installed will list several inputs. Picking a device nothing is plugged into gives you a silent track.
Check before you rely on it: open the finished recording in QuickTime Player and press ⌘I for the Movie Inspector. The **Format** line names the audio track — something like `AAC, Stereo (L R), 48000 Hz` — and lists the video details alone when no audio was captured. Playing it back tells you less than you would think: a silent track and no track at all sound identical.
## How to record your microphone in a QuickTime screen recording
1. Open **QuickTime Player** from Applications or Spotlight.
2. Choose **File** → **New Screen Recording** (⌃⌘N). The Screenshot toolbar appears.
3. Click **Options** and select your microphone under **Microphone**.
4. While the Options menu is open, check **Save to** as well — see [where recordings go](#where-does-a-quicktime-screen-recording-with-audio-get-saved).
5. Choose whether to capture the entire screen or a selected portion using the toolbar buttons — on macOS Tahoe 26 and later, a single window as well.
6. Click **Record**, then stop from the menu bar icon when you are done.
Picking a microphone in that menu is not the same as confirming it works — the toolbar gives you no input meter, so a dead mic looks exactly like a live one right up until you play the recording back. If you are not certain, open **System Settings** → **Sound** → **Input** first and watch the input level move as you talk. That is the only live meter macOS offers you before recording starts.
## How do I record system audio in QuickTime?
macOS will not send your Mac's audio to a recorder on its own, so you install a virtual audio device — a fake output that other apps can record from as though it were a microphone. [BlackHole](https://existential.audio/blackhole/) is the free, open-source one most people use. Soundflower is its abandoned predecessor and is not worth installing.
1. Install **BlackHole 2ch**.
2. Open **Audio MIDI Setup** from Applications → Utilities.
3. Click **+** in the bottom-left corner and choose **Create Multi-Output Device**.
4. Tick your normal speakers or headphones **first**, then **BlackHole 2ch**. Including your real output is what lets you still hear the audio while it records, and the order matters — your physical output has to sit at the top of the list as the clock device. Switch on **Drift Correction** for everything below the top device.
5. In **System Settings** → **Sound**, set your output to that Multi-Output Device.
6. In QuickTime, choose **File** → **New Screen Recording**, open **Options**, and pick **BlackHole 2ch** under **Microphone**.
7. Record. When you are finished, set your sound output back to your speakers.
Two things to expect while this rig is active. Your volume keys stop working, because a Multi-Output Device has no master volume — you set levels per app or in Audio MIDI Setup. And every other app on your Mac keeps playing through the recording setup until you switch the output back, so it is worth doing immediately rather than later.
The [full walkthrough with the failure modes](/record/screen-recorder-mac-with-audio) goes deeper on this setup if step 4 does not behave.
## Can QuickTime record your microphone and system audio at the same time?
No — and this is the point where most guides give advice that does not work.
QuickTime has exactly one microphone slot. Once BlackHole is in it, you are capturing your Mac's audio instead of your voice, not as well as it. The standard suggestion is to go back into Audio MIDI Setup and build an **Aggregate Device** combining your microphone and BlackHole, which sounds like it should merge them.
It does not. An Aggregate Device stacks its devices as consecutive channels rather than mixing them, so your mic lands on channels 1 and 2 and BlackHole on channels 3 and 4. QuickTime has no channel picker and records the first two. What you get back is your microphone on its own, exactly as if BlackHole were not there — which is a particularly annoying way to discover the problem, because the recording has audio and sounds fine until you notice the demo you were narrating is silent.
Getting both means moving to a recorder that can map channels — Audacity, GarageBand or OBS — and mixing them down yourself at record time. That works, but it decides the balance between your narration and your Mac's audio before you have heard the result.
## How do I record audio only on QuickTime Mac?
If you do not need the screen at all, QuickTime has a separate mode for this.
1. Open **QuickTime Player**.
2. Choose **File** → **New Audio Recording** (⇧⌘N).
3. Click the arrow next to the record button to choose your microphone and recording quality.
4. Click the record button, then stop and save with ⌘S.
It saves an `.m4a` file. Like screen recording, it captures a microphone only — recording the audio your Mac is playing needs the same BlackHole routing described above.
## Where does a QuickTime screen recording with audio get saved?
Wherever the **Save to** section of the **Options** menu points, and the default catches people out.
When you start a recording from QuickTime Player, **Save to** is set to **QuickTime Player**. The finished recording opens in an untitled QuickTime window and is not on disk yet — you have to save it with ⌘S. Quit without saving and the recording is gone, audio and all.
Set **Save to** to **Desktop** or **Other Location...** before you record if you would rather the file just appear. Recordings are saved as `.mov`. The [QuickTime screen recording guide](/blog/how-to-screen-record-on-mac) goes through the rest of the Options menu.
To stop the recording in the first place, click the stop icon in the menu bar or press ⌃⌘Esc — there is a [full guide to stopping a Mac screen recording](/blog/how-to-stop-screen-recording-on-mac) if the menu bar icon is not there.
## If you want the sound to just work
Everything above is a workaround for one gap: macOS treats the sound coming out of your Mac as something you are not allowed to record, and QuickTime inherits that.
[Tella's Mac app](/mac) treats system audio as a normal input. You pick your microphone and switch on system audio, and both are captured — as **separate tracks**, which is the part that matters. The balance between your narration and whatever your Mac was playing stays adjustable after the recording, instead of being committed the moment you press record. There is no virtual driver to install, nothing to reroute in System Settings, and no output to remember to switch back.
| | QuickTime Player | QuickTime + BlackHole | Tella Mac app |
| --- | --- | --- | --- |
| Microphone | Yes | Yes | Yes |
| System audio | No | Yes | Yes |
| Both at once | No | No | Yes |
| Separate audio tracks | No | No | Yes |
| Screen + camera together | No | No | Yes |
| Setup required | None | Virtual driver + Audio MIDI Setup | None |
| Editing | Trim only | Trim only | Full editor |
For a silent capture, or a quick clip where your voice is the only sound that matters, QuickTime is the fastest thing on the machine and you should just use it.
## The short version
QuickTime records a microphone, and only after you select one under **Options** → **Microphone** — the None default is why most silent recordings are silent. It cannot record your Mac's system audio at all. You can force it to with BlackHole and a Multi-Output Device, at the cost of your microphone slot, and no Aggregate Device arrangement will get you both at once, because QuickTime only ever reads the first two channels.
If you are recording your screen more than occasionally, the [step-by-step QuickTime screen recording guide](/blog/how-to-screen-record-on-mac) covers the rest of the workflow.