> ## Documentation Index
> Fetch the complete documentation index at: https://www.tella.com/docs/llms.txt
> Use this file to discover all available pages before exploring further.
# Resize a window for consistent recordings
> Snap the window you're recording to a preset size in the Tella Mac app so every clip has the same shape, and your layouts and zooms line up across takes.
When you record a single window with the Tella Mac app, you can resize that window to an exact preset (like 1920×1080 or 1280×1280) before you hit record. Use the same preset every time and every clip in your video comes out the same shape, which keeps layouts, zooms, and crops consistent from take to take and from video to video.
## Resize the window
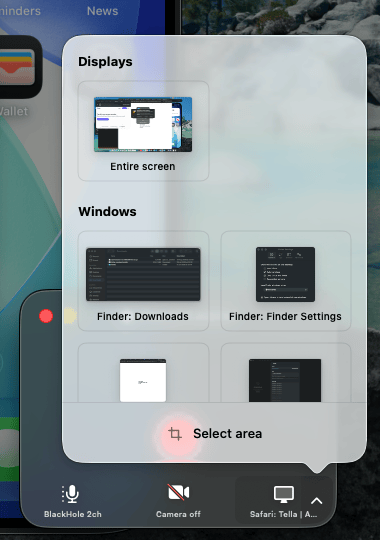
1. In the recorder, hover the screen button and click the **chevron** next to it. Under **Windows**, click the window you want to record. Tella brings it to the front and draws an outline around it.
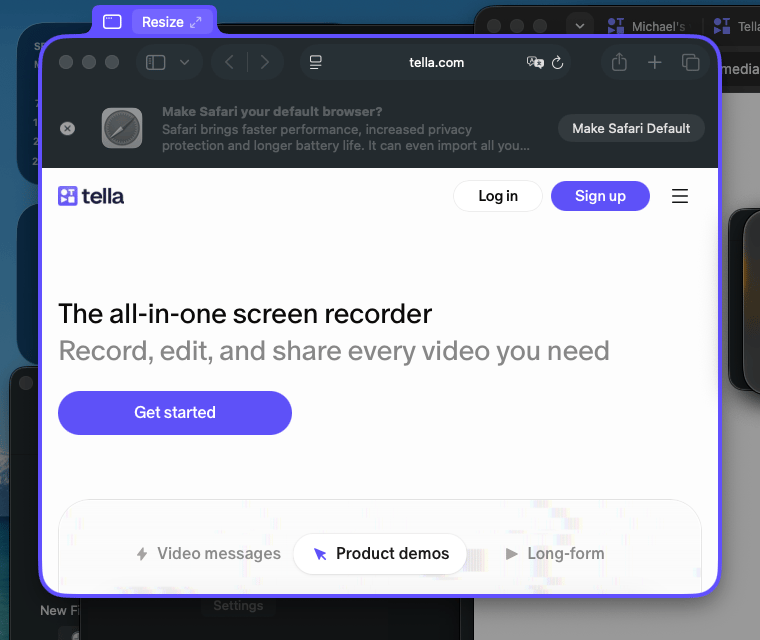
 2. A small tab appears above the top-left corner of the outlined window. Click **Resize** on that tab.
 3. Pick a preset from the menu:
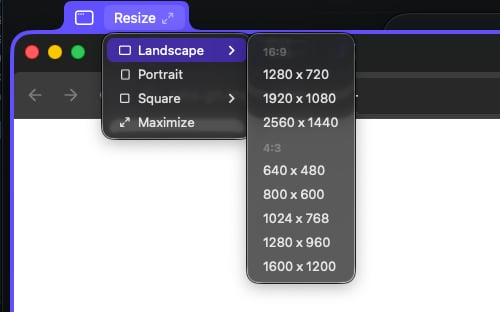
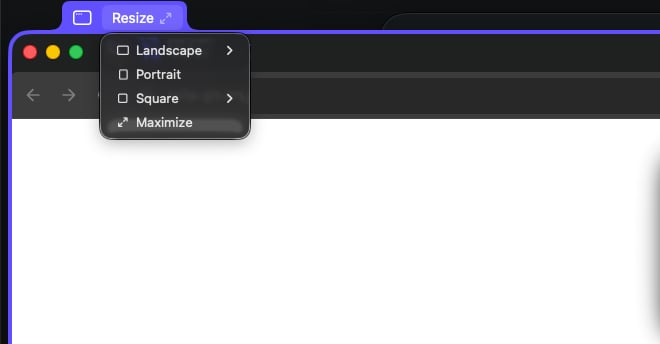 * **Landscape** — 16:9 sizes (1280×720, 1920×1080, 2560×1440) and 4:3 sizes (640×480 up to 1600×1200)
 * **Portrait** — makes the window 960 tall and as narrow as the app allows. Its exact shape depends on that app's minimum width, so it isn't a fixed 9:16 size.
* **Square** — 640×640 up to 1600×1600
* **Maximize** — fill the available screen space
The window snaps to that size immediately. You can also drag the tab to move the window around the screen without changing its size.
The first time you click **Resize**, macOS asks you to give Tella **Accessibility** permission. Tella uses it to resize and move other apps' windows, and nothing else. Approve the prompt, or switch Tella on under **System Settings → Privacy & Security → Accessibility**, then click **Resize** again.
Presets that don't fit on your display are greyed out. If the size you want isn't available, move the window to a bigger display or pick the next size down. Your **Screen** quality setting caps the final resolution, but Tella doesn't upscale a smaller window, so a smaller preset in the same aspect ratio gives you the same shape but may reduce resolution.
## Why this makes recordings consistent
Tella records a window at the shape it has on screen. If the window is 1400×900 in one take and 1100×1000 in the next, those clips have different aspect ratios. Layouts have to fit each one differently, zooms drift, and the edges of your screen recording move between clips.
Snapping to the same preset every time removes that variable:
* **Clips match.** Every clip in a multi-clip video has the same shape, so the same layout looks the same in all of them.
* **Re-records line up.** When you [re-record a clip](/docs/help/recording/re-record-clips), the new take drops in at exactly the same size as the old one.
* **Videos match each other.** Record a series of demos over weeks, and they all have the same framing.
* **No crop surprises.** A 16:9 window fits a 16:9 canvas edge to edge with no letterboxing, and a square window fills a square canvas.
Pick the preset that matches where the video is going, then set the same shape as your [canvas size](/docs/help/editing/change-canvas-size) in the editor:
| Where it's going | Window preset | Canvas |
| ---------------------------- | ------------------------------- | ------ |
| YouTube, docs, landing pages | Landscape 16:9 (1920×1080) | 16:9 |
| LinkedIn, Instagram feed | Square (1024×1024 or 1280×1280) | 1:1 |
For vertical video (Shorts, Reels, TikTok), **Portrait** gets you a tall window but not an exact 9:16 one, so set a 9:16 canvas and expect to adjust the clip's position or zoom to fill it. For a fixed vertical size, record the entire screen and crop in the editor instead.
The sizes in the menu are screen points, not pixels. On a Retina display a 1920×1080 window is captured at 3840×2160 pixels, which is plenty for a **Very High (4K)** screen quality setting. See [record in 4K](/docs/help/recording/record-a-video-using-the-mac-app#record-in-4k).
## Tips for a repeatable setup
* **Resize before every recording.** The resize applies to the window as it is right now. If you close and reopen the app, or it restores a saved size, click **Resize** again before you record.
* **Resize, then move.** Pick the preset first, then drag the tab to position the window. Moving doesn't change the size.
* **Record the window, not the display.** Presets only work when a window is selected. If you record a whole display, the recording is the display's shape. To capture a region instead, use **Select area** and drag out the same region each time.
* **Hide the noise.** A resized window still shows whatever is inside it. Close extra tabs, clear notifications, and tidy the content before you record. The window's own title bar and edges are recorded as part of the window.
## Troubleshooting
* **The Resize button doesn't appear.** It only shows when a **window** is selected in the screen popover, and it hides while you're recording. Select the window again from the **Windows** list.
* **"Couldn't resize the window."** Tella's Accessibility permission has gone stale, which can happen after an app update. Click **Open Accessibility Settings** in the alert, toggle Tella **off and on again** under **Accessibility**, and try again. This is the same fix as for [screen, camera, and mic permissions](/docs/help/mac-app/cant-record-on-mac-check-screen-camera-and-mic-permissions).
* **The window resized, but not to the size I picked.** Some apps enforce a minimum or fixed window size and won't go smaller (or larger) than that. Pick a preset the app can honor, or use a different window.
* **Some presets are greyed out.** They're larger than the free space on the display the window is on. Move the window to a larger display or choose a smaller preset with the same aspect ratio.
* **Chrome windows won't resize.** Update to Tella for Mac 2.31 or later, which fixes resizing Chrome windows.
## Related topics
- [Use speaker notes while recording (teleprompter)](/docs/help/recording/use-speaker-notes-while-recording.md)
- [Crop screen recordings](/docs/help/editing/crop-screen-recordings.md)
- [Mac App](/docs/changelog/mac-app.md)
- [Record a video using the Mac app](/docs/help/recording/record-a-video-using-the-mac-app.md)
- [Add zooms and screen effects](/docs/help/editing/add-a-zoom.md)
* **Portrait** — makes the window 960 tall and as narrow as the app allows. Its exact shape depends on that app's minimum width, so it isn't a fixed 9:16 size.
* **Square** — 640×640 up to 1600×1600
* **Maximize** — fill the available screen space
The window snaps to that size immediately. You can also drag the tab to move the window around the screen without changing its size.
The first time you click **Resize**, macOS asks you to give Tella **Accessibility** permission. Tella uses it to resize and move other apps' windows, and nothing else. Approve the prompt, or switch Tella on under **System Settings → Privacy & Security → Accessibility**, then click **Resize** again.
Presets that don't fit on your display are greyed out. If the size you want isn't available, move the window to a bigger display or pick the next size down. Your **Screen** quality setting caps the final resolution, but Tella doesn't upscale a smaller window, so a smaller preset in the same aspect ratio gives you the same shape but may reduce resolution.
## Why this makes recordings consistent
Tella records a window at the shape it has on screen. If the window is 1400×900 in one take and 1100×1000 in the next, those clips have different aspect ratios. Layouts have to fit each one differently, zooms drift, and the edges of your screen recording move between clips.
Snapping to the same preset every time removes that variable:
* **Clips match.** Every clip in a multi-clip video has the same shape, so the same layout looks the same in all of them.
* **Re-records line up.** When you [re-record a clip](/docs/help/recording/re-record-clips), the new take drops in at exactly the same size as the old one.
* **Videos match each other.** Record a series of demos over weeks, and they all have the same framing.
* **No crop surprises.** A 16:9 window fits a 16:9 canvas edge to edge with no letterboxing, and a square window fills a square canvas.
Pick the preset that matches where the video is going, then set the same shape as your [canvas size](/docs/help/editing/change-canvas-size) in the editor:
| Where it's going | Window preset | Canvas |
| ---------------------------- | ------------------------------- | ------ |
| YouTube, docs, landing pages | Landscape 16:9 (1920×1080) | 16:9 |
| LinkedIn, Instagram feed | Square (1024×1024 or 1280×1280) | 1:1 |
For vertical video (Shorts, Reels, TikTok), **Portrait** gets you a tall window but not an exact 9:16 one, so set a 9:16 canvas and expect to adjust the clip's position or zoom to fill it. For a fixed vertical size, record the entire screen and crop in the editor instead.
The sizes in the menu are screen points, not pixels. On a Retina display a 1920×1080 window is captured at 3840×2160 pixels, which is plenty for a **Very High (4K)** screen quality setting. See [record in 4K](/docs/help/recording/record-a-video-using-the-mac-app#record-in-4k).
## Tips for a repeatable setup
* **Resize before every recording.** The resize applies to the window as it is right now. If you close and reopen the app, or it restores a saved size, click **Resize** again before you record.
* **Resize, then move.** Pick the preset first, then drag the tab to position the window. Moving doesn't change the size.
* **Record the window, not the display.** Presets only work when a window is selected. If you record a whole display, the recording is the display's shape. To capture a region instead, use **Select area** and drag out the same region each time.
* **Hide the noise.** A resized window still shows whatever is inside it. Close extra tabs, clear notifications, and tidy the content before you record. The window's own title bar and edges are recorded as part of the window.
## Troubleshooting
* **The Resize button doesn't appear.** It only shows when a **window** is selected in the screen popover, and it hides while you're recording. Select the window again from the **Windows** list.
* **"Couldn't resize the window."** Tella's Accessibility permission has gone stale, which can happen after an app update. Click **Open Accessibility Settings** in the alert, toggle Tella **off and on again** under **Accessibility**, and try again. This is the same fix as for [screen, camera, and mic permissions](/docs/help/mac-app/cant-record-on-mac-check-screen-camera-and-mic-permissions).
* **The window resized, but not to the size I picked.** Some apps enforce a minimum or fixed window size and won't go smaller (or larger) than that. Pick a preset the app can honor, or use a different window.
* **Some presets are greyed out.** They're larger than the free space on the display the window is on. Move the window to a larger display or choose a smaller preset with the same aspect ratio.
* **Chrome windows won't resize.** Update to Tella for Mac 2.31 or later, which fixes resizing Chrome windows.
## Related topics
- [Use speaker notes while recording (teleprompter)](/docs/help/recording/use-speaker-notes-while-recording.md)
- [Crop screen recordings](/docs/help/editing/crop-screen-recordings.md)
- [Mac App](/docs/changelog/mac-app.md)
- [Record a video using the Mac app](/docs/help/recording/record-a-video-using-the-mac-app.md)
- [Add zooms and screen effects](/docs/help/editing/add-a-zoom.md)