How to Change Your Cursor on Mac (Size, Color, and Speed)
How to change the cursor on a Mac: resize the pointer, recolor its fill and outline, adjust pointer speed, and put everything back to normal when it goes wrong.
macOS gives you less control over the cursor than Windows does, and the gap catches people out. You can make the pointer bigger, change its fill and outline colors, and make it grow when you shake it. What macOS won't do — not in System Settings, not anywhere in the OS — is swap the arrow for a different image. There's no cursor theme system, and Apple has never shipped one. Third-party tools reach past that using private APIs, which is a real option and a fragile one; there's a section below on why it's rarely worth it.
The good news is that the built-in settings cover almost everything people actually want, and they take about ten seconds. This guide walks through pointer size, color, finding a lost pointer and pointer speed, explains why replacing the arrow itself isn't something you should chase, and shows how to put it all back when your pointer ends up somewhere you didn't intend.
Everything below is written for macOS Ventura (13) through macOS Tahoe (26). On Monterey (12) and earlier the same controls live in System Preferences rather than System Settings, in the same Accessibility section.
Quick answers
| What you want | Where to go |
|---|---|
| Bigger pointer | Accessibility → Display → Pointer → Pointer size |
| Different pointer color | Accessibility → Display → Pointer → fill and outline color |
| Find a lost pointer | Accessibility → Display → Pointer → Shake mouse pointer to locate |
| Faster or slower pointer | Mouse or Trackpad → Tracking speed, under a Point & Click tab on Sequoia (15) and later |
| A custom pointer image | No supported way — unofficial tools exist, with real risks |
| Pointer colors back to default | Accessibility → Display → Pointer → Reset Colors |
How to change the pointer size on Mac
- Open System Settings.
- Go to Accessibility → Display.
- Select the Pointer tab.
- Drag the Pointer size slider from Normal toward Large.
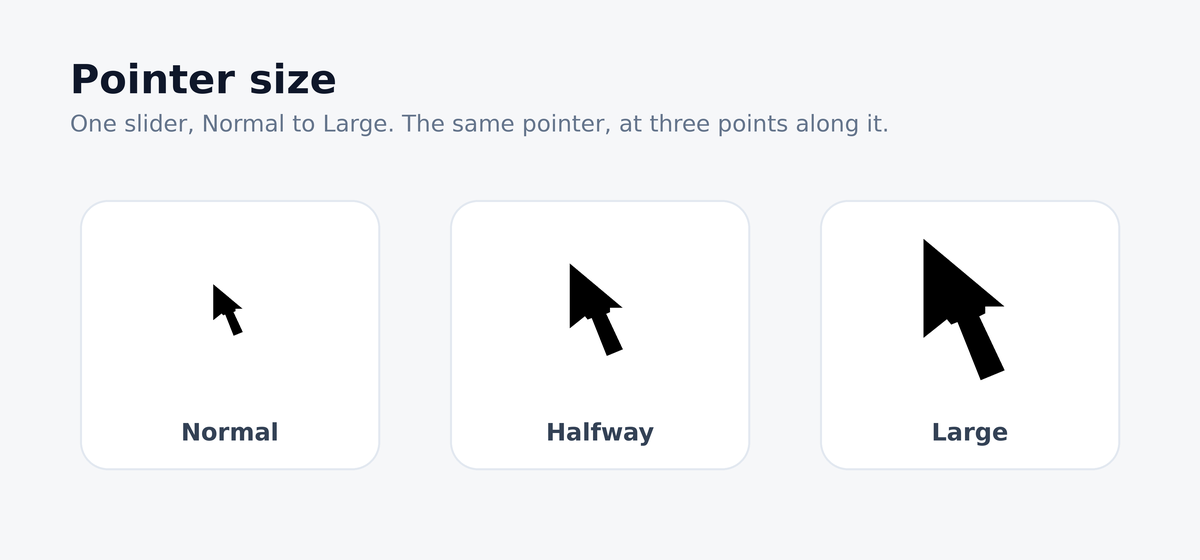
The size changes as you drag, so you can watch it and stop where it feels right. It applies system-wide, survives restarts, and — worth knowing if you make tutorials — it stays large in screenshots and screen recordings.
This is the setting most people are actually looking for. A pointer one or two notches above Normal is much easier to follow on a large display without looking comical.
How to change the pointer color on Mac
In the same Accessibility → Display → Pointer pane there are two color swatches:
- Pointer fill color — the body of the arrow, black by default.
- Pointer outline color — the border around it, white by default.
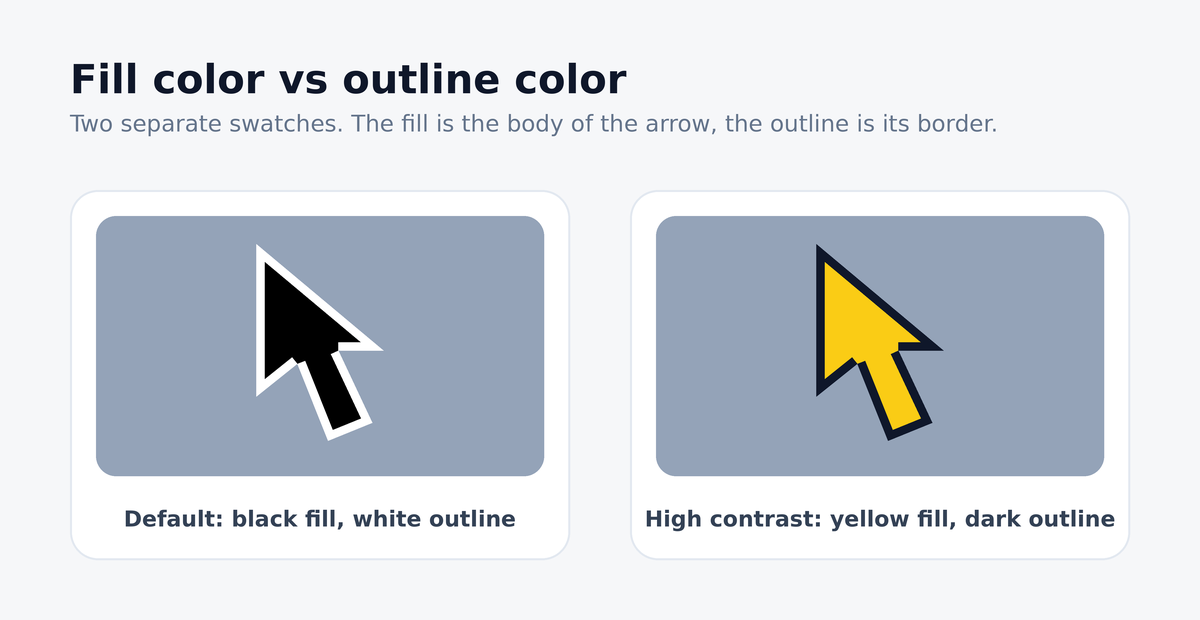
Click either swatch to open the standard macOS color picker. The pointer updates immediately, so you can leave the picker open and try a few options.
These controls arrived in macOS Monterey. If you don't see them, you're on an older release and size is the only appearance setting available to you.
Two things to expect. Contrast between the two colors matters more than the colors themselves — a bright fill with a dark outline stays readable over both light and dark windows, while two similar colors disappear against half the things on your screen. And the setting only governs the standard system cursors. Apps that ship their own pointer art, including many games and some design and remote-desktop tools, will keep drawing their own, and the spinning wait cursor keeps its own look regardless.
How to find a lost pointer
Also in the Pointer tab: Shake mouse pointer to locate. With it on, quickly shaking the mouse or swiping back and forth on the trackpad briefly balloons the pointer so you can spot it, then it shrinks back.
This is on by default, so if shaking does nothing, it has been switched off at some point.
How to change pointer speed on Mac
Pointer speed lives somewhere else entirely, and each input device keeps its own value. Apple moved this control in macOS Sequoia, so the exact path depends on which version you're on:
- macOS Sequoia (15) and later, Tahoe (26) included: System Settings → Mouse or Trackpad → Point & Click → Tracking speed.
- macOS Ventura (13) and Sonoma (14): System Settings → Mouse or Trackpad → Tracking speed, sitting directly in the pane with no tab to click first.
If you use both a mouse and a trackpad, setting one does nothing to the other. That's usually the answer when a Mac feels fast on the trackpad and sluggish on the mouse.
Can you use a custom cursor image on Mac?
Not in any way Apple supports — and the unsupported route is where most guides go wrong.
macOS has no cursor theme system. There is no setting, no supported file format, and no Apple-sanctioned way to hand the system your own pointer artwork. That has been true for the entire history of macOS, and Tahoe doesn't change it.
Third-party tools do manage it anyway, by calling private CoreGraphics functions — the internal ones macOS uses to set up its own cursors, which Apple doesn't support anyone else calling. So the honest answer isn't "impossible", it's "possible, unsupported, and rarely worth it". Three things follow from relying on private APIs, and they're why this guide doesn't walk you through one:
- They break on every major macOS release. Private APIs change without notice, so each new version of macOS needs the tool updated before cursors behave properly again — and you find out by upgrading.
- The best-known option is effectively unmaintained. It has well over a hundred open issues, no longer accepts new ones from most people, and carries reports from this month of the pointer vanishing when it moves between windows and of cursor packs only half-applying.
- The download ecosystem around them is genuinely unsafe. Free cursor packs are a well-worn malware channel, and there's an open report of one page in this space serving a
curl-piped-to-shell payload. Treat any cursor site that asks you to paste a command into Terminal as hostile — no legitimate cursor pack has ever needed one.
If what you actually want is a pointer that's easier to see, the size and color controls above do that properly. They survive every macOS update, apply everywhere the system cursor is drawn, and can't break anything.
How to reset your cursor back to normal
Work down this list:
- Wrong color: System Settings → Accessibility → Display → Pointer → Reset Colors. This restores Apple's defaults — a white outline and a black fill — and nothing else. It deliberately leaves the size alone, so a pointer that is both recolored and enlarged still looks wrong afterwards.
- Wrong size: there's no reset for this one. Drag the Pointer size slider back to Normal yourself, in the same pane.
- Pointer is a crosshair: you're in screenshot mode, not a broken setting. Press Esc.
- A cursor a third-party app changed: quit and uninstall the app that set it, then log out and back in — these tools install a background helper that reapplies the cursor at login, so quitting the app alone often isn't enough.
- Pointer has disappeared entirely: shake the mouse to trigger the locate animation, and if that fails, switch apps with ⌘Tab — a stuck app is a more common cause than a cursor setting.
If you're changing your cursor for screen recordings
A good number of people arrive at this question because their pointer is hard to follow in a demo or tutorial, not because they want novelty artwork. If that's you, the built-in settings are the whole answer.
Nudge the Pointer size slider up a notch or two before you record. Screen recorders capture the pointer as macOS draws it, so whatever you set is what your viewers get — and viewers on a phone are working with a fraction of the pixels you had on your monitor. A high-contrast fill and outline pairing helps for the same reason. Record fifteen seconds and watch it back on your phone before committing to a setting; it's much faster than guessing.
The other half of the problem is that a small pointer moving around a full-screen recording is hard to follow no matter what color it is. That's what zooming fixes. Tella records cursor movement alongside your screen, and Auto Zoom uses it to work out where the action is and push in on it automatically — so the viewer gets a close-up of what you're clicking instead of hunting for a pointer in a 4K frame. Cursor data comes from the Mac and Windows apps, and from the Chrome extension when you record a browser tab.
The short version
For nearly everyone, the answer to "how do I change my cursor on Mac" is one pane: System Settings → Accessibility → Display → Pointer, where you can size it, recolor it, and put it back. Replacing the pointer image is the one thing macOS itself won't do for you, and the unofficial workarounds that manage it cost more than they're worth. The built-in settings solve the actual problem more often than people expect.