How to Add Zooms to Your Screen Recording After You Record
How to add automatic zooms to a screen recording after you've recorded it: generate zooms from your clicks, pick a style, fix the ones you don't like, add motion blur, and share a hosted link without re-recording.
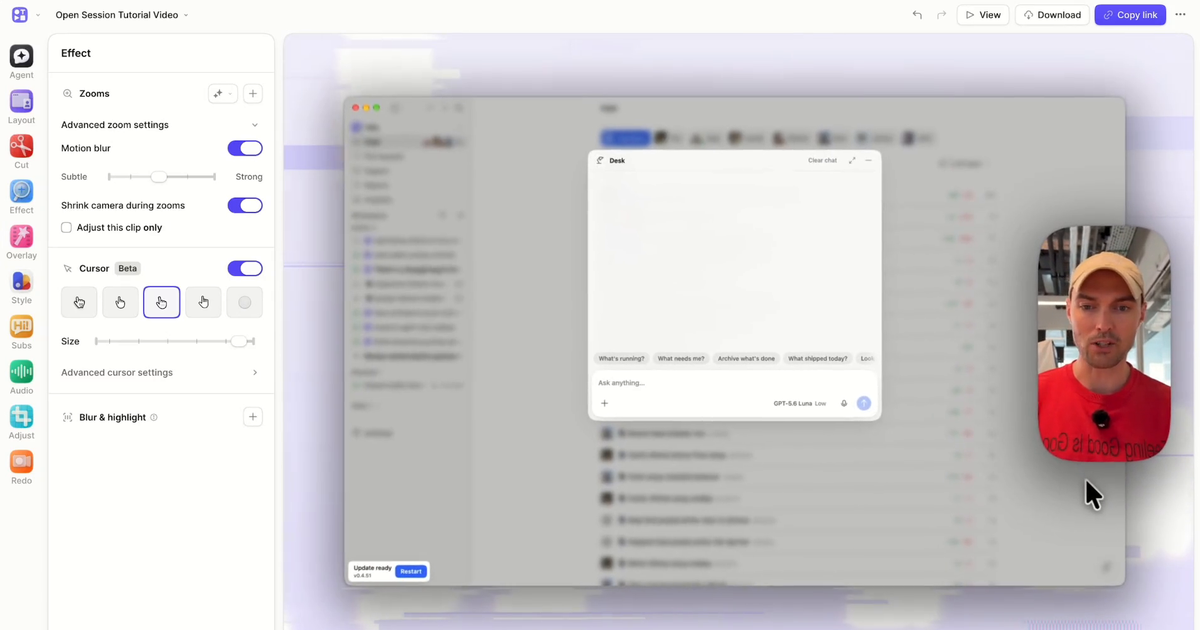
You don't zoom while you record. Record the screen as normal, open the video in the Tella editor, click Effect, then Generate zooms. Tella uses the clicks and cursor movement it captured during the recording to put a zoom on each piece of action. Pick a style, fix the ones you'd have placed differently, turn on motion blur, and share the link.
Below: what Auto Zoom needs from the recording, how the styles differ, and how to clean up what it generates.
Why zooms are added after recording
Older screen recorders zoomed live. You held a key, dragged the view, and the zoom was baked into the footage. To change it, you recorded again.
Tella captures the screen at full resolution and stores the cursor position and every click as data next to it. Zooms are computed from that data in the editor. Because a zoom is an effect on top of the footage, you can move it, resize it, delete it, or change your mind a week later. That's how Auto Zoom works, and why nothing below involves recording twice.
What you need
Auto Zoom needs cursor and click data, so the recording has to come from a source that captures it:
- Tella for Mac and Tella for Windows capture it for any screen recording. Choose Animated cursor or Hide cursor before recording if you also want to restyle the pointer later. Show cursor bakes the pointer into the video, but zooms still work.
- The Tella Chrome extension captures it when you share a browser tab. Sharing a window or your whole screen doesn't include cursor data.
- Uploaded videos and camera-only clips don't have it. You can add zooms to an uploaded screen recording by hand (see below), but not generate them.
For demos, use the desktop apps. They record up to 4K, capture system audio, and always include cursor data.
Step 1: Record as normal
Click through what you're demonstrating at a normal pace. Don't slow down or hover to "help" the zooms; the algorithm keys off real clicks, and unnatural pauses produce zooms with nothing in them.
Two habits that improve the generated zooms:
- Click where you want the viewer to look. A click is the strongest signal Auto Zoom has. If you talk about a setting without clicking it, the zoom may stay on your last click.
- Park the cursor while you talk. Wandering the pointer around creates jittery targets.
Step 2: Generate zooms
- Open the recording in the editor.
- Click Effect in the sidebar, or press
E. The Effect timeline shows zoom, blur, and highlight cards above the transcript. - Under Zooms, click Generate zooms (the sparkles icon).
- Choose a Style:
- Adaptive (default) follows your clicks and adjusts depth to the amount of activity.
- Subtle: fewer, shallower, longer zooms. Good for lectures and long tutorials.
- Moderate: between Subtle and Intense.
- Intense: more frequent, deeper, shorter zooms. Good for short social demos.
- Click Generate.
The menu stays open while you compare styles. Tella remembers the last style you chose and uses it next time.
Scrub through the result once. Expect a handful of zooms you'd keep, a couple to nudge, and maybe one to delete.
Step 3: Fix the ones you don't agree with
Generated zooms are ordinary zooms, so everything here works on both.
Move or resize: drag a zoom card along the Effect timeline to move it, or drag either edge to change its duration. The preview follows the edge you're dragging while the playhead stays put.
Change the target or depth: select the card and choose a Mode:
- Manual locks onto a fixed point. Drag the Target on the canvas, then set Scale (100% to 350%). Hold Cmd (Mac) or Ctrl (Windows) while dragging to keep the target on a horizontal or vertical line.
- Auto follows the recorded cursor for the length of the zoom.
Delete: select the card and press Delete or Backspace. To start over, open More actions and choose Reset all zooms.
Split: put the playhead inside a zoom and press X. Both halves keep the original mode, target, and scale, which is the quickest way to retarget the second half of a long zoom.
Pan instead of zooming out: place two zooms directly beside each other and Tella pans between the targets without zooming out in between. Drag the shared seam to move the boundary.
Add one Auto Zoom missed: drag across a range on the timeline (or across words in the transcript) and press Z. With nothing selected, Add zoom creates a zoom of up to five seconds from the playhead.
Zooms snap to transcript word boundaries and other zoom edges. Hold Option (Mac) or Alt (Windows) to drag freely.
Step 4: Motion blur, animation style, and camera shrink
- Motion blur. Under Zooms, expand Advanced zoom settings, turn on Motion blur, and drag the slider between Subtle and Strong. It softens the fast part of every zoom and pan, and the cursor if you use the animated cursor. About a third of the way along is a good start.
- Animation style. Open Layout, click Layout settings, and under Animation choose Gentle, Moderate, or Snappy. Gentle suits tutorials; Snappy suits 30-second product clips. The style applies to zooms and layout changes together.
- Shrink camera during zooms. If you have a camera bubble, turn this on in Advanced zoom settings. The bubble shrinks while a zoom plays and returns to size when it ends, so it doesn't cover the detail.
All three apply to the whole video by default. Turn on Adjust this clip if you want a different setting on one clip.
Step 5: Share
Click Share in the top right, then Copy link. Tella hosts the video and the zooms play in the hosted version, so there's no export or render to wait for. If you need a file for YouTube or a course platform, export an MP4 in up to 4K.
Auto-apply zooms to every recording
To skip the Effect panel entirely:
- Click your avatar and open Settings.
- Go to Preferences under Account.
- Under Recording, turn on Auto-apply zooms.
Tella adds zooms as soon as the recording's uploads finish, using the last style you picked (Adaptive if you've never chosen one). You can still open the editor and adjust them.
Zooms on a video recorded somewhere else
Upload the MP4 to Tella and add zooms by hand:
- Select the range you want zoomed on the timeline.
- Press
Z. - Set Mode to Manual, drag the Target, and choose a Scale.
Hold Shift while dragging to select several ranges and create a zoom for each at once. Copy and paste (Cmd/Ctrl + C, Cmd/Ctrl + V) carries mode, target, scale, and duration between videos.
Common mistakes
- Zooming too far. A 350% zoom into a 1080p recording gets soft. Use the lowest scale that makes the detail readable, and record in 4K on the desktop apps if you know you'll zoom a lot.
- Intense style on a long tutorial. It's tiring to watch. Use Subtle or Adaptive for anything over a few minutes.
- A zoom that outlives its dialog. Trim the zoom's end to the moment the action finishes; the word markers on the Effect timeline make it easy to line up with your narration.
- Zooms that cut off mid-sentence. Zooms snap to transcript words, so drag the edge to the end of the sentence you're saying about that area.
Related reading
- Screen effects in Tella: zooms, animated cursors, blur, and highlight in one panel.
- Animated cursors for screen recordings: restyle the pointer after recording.
- Best screen recorders with automatic zooms and hosted sharing: how the tools compare.
- Add zooms and screen effects: the help center reference for every zoom control.
Try Tella free for 7 days and generate zooms on your next recording.