How to Blur Passwords and Customer Data in a Screen Recording
How to blur a password, email address, API key, or customer record in a screen recording after you've recorded it: add a blur, size it, time it to the edit, and check the export before you share.
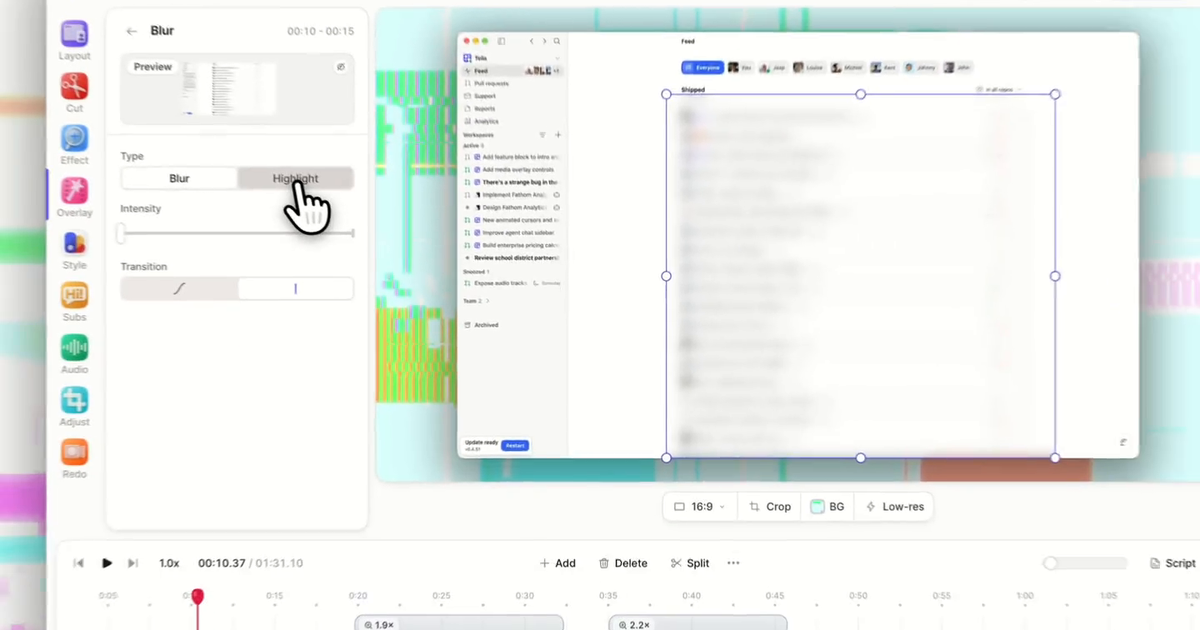
You don't need to re-record. Open the video in the Tella editor, press E to open the Effect panel, click the plus button beside Blur & highlight, drag the blur over the password or record, and drag the ends of its card on the timeline to cover the seconds it's on screen. Add another blur for each field. The hosted link and the MP4 export both carry the blur.
Below: what to blur, how to size and time it, where a blur can still leak, and how to check the export.
What to blur, and what not to record
Blur is the second line of defence. The first is not recording the data at all. Before you hit record:
- Use a demo workspace or seeded test account rather than production.
- Sign out of password managers and close the browser's saved-passwords dropdown. Autofill suggestions are the most common leak because they appear for a fraction of a second.
- Clear or hide notification banners. Slack and email previews sliding in mid-demo can't be planned for.
Then blur whatever still gets through:
| Category | Examples |
|---|---|
| Credentials | Passwords, API keys, tokens, connection strings, 2FA codes |
| Personal data | Customer names, email addresses, phone numbers, postal addresses |
| Financial data | Card numbers, invoice totals, bank details, revenue dashboards |
| Internal data | Unreleased feature flags, roadmap items, private Slack channels, internal URLs |
| Identifiers | Account IDs, order numbers, ticket IDs that can be searched later |
If a screen has more than three or four of these, re-recording against test data is faster than blurring every field. One or two, blur.
Step 1: Add a blur
- Open the video in the editor.
- Click Effect in the sidebar, or press
E. Zooms, cursor controls, and Blur & highlight are all in this panel. - Move the playhead to the moment the data first appears. You can also select a range on the timeline or in the transcript first; a selected range takes priority over the playhead and sets the blur's duration in one go.
- Click the plus button beside Blur & highlight. Tella adds a blur and opens its settings.
Blur works on screen recordings from any source, including uploaded videos, so this also covers a recording made with another tool.
Step 2: Size and position it
On the canvas, drag the blur over the data and resize it from the corners. Two rules:
- Over-cover by a margin. A blur that ends exactly at the last character leaves the character's edge readable.
- Cover the region, not the value. If a field will change during the recording (you type a password, a total updates), blur the whole field, not just the characters that are there when you add it.
If you add the blur while a zoom is playing, Tella places it in the centre of the zoomed area. You can then drag it anywhere on the full recording, including outside the visible canvas, which matters when the zoom moves away and the data is still on screen.
Step 3: Time it to the edit
On the Effect timeline, the blur is a card you can move and resize:
- Drag either end to set when it starts and stops. The preview follows the edge you're dragging so you can see the exact frame.
- Drag the card to move it earlier or later.
- Hold Option (Mac) or Alt (Windows) to drag without snapping.
- Hover over the card or a handle to preview the frame under your pointer without moving the playhead.
Blur timing follows the edited timeline. If you cut a section later, the blur skips the cut without re-timing. If the playhead is inside a cut when you add a blur, Tella starts it at the first visible frame after the cut.
Start the blur a frame or two before the data appears and end it a frame or two after it disappears. A blur that starts early costs nothing; one that starts a frame late shows the password.
Step 4: Several fields at once
A settings page or a customer record usually has more than one thing to hide. Click the plus button again for each one, or open Add in the timeline toolbar and choose Add blur. Each blur gets its own track on the Effect timeline, so overlapping blurs stay visible and independently adjustable.
To hide the same field in two places in the video, duplicate the blur. The copy keeps the size, position, timing, and transition; move it to the second occurrence.
Step 5: Content that moves
Blur is anchored to the recording, not to the content underneath, so a value that scrolls or moves needs one of two treatments:
- Split and reposition. Put the playhead where the content moves, select the blur, and press
X(or click Split). The right half keeps the same size and settings; drag it to the new position. Repeat for each move. Splitting requires the blur's Transition to be Hard cut; switch it back to Smooth afterwards if you want the fade. - Widen the blur. For a column of email addresses in a table you're scrolling, blur the whole column for the whole scroll. It's cruder, but nothing leaks.
For a modal that opens and closes, one blur with a start and end time is enough.
Step 6: Intensity and transition
Select the blur to open its settings:
- Intensity makes the blur heavier. It never gets lighter than the default, so lowering it only returns to standard strength and covered text stays hidden either way. Raise it for large text, which survives a light blur.
- Transition is Hard cut by default: the blur appears and disappears instantly. Smooth fades it in and out, which looks better for blurs that stay on screen a while. Use Hard cut for anything that appears suddenly, like an autofill dropdown, so no frame of it is partly visible during a fade.
Blur vs. highlight
Highlight is the same effect with Type switched: instead of hiding the framed area, it darkens everything else. Use it when the goal is focus rather than privacy: one button in a busy toolbar, one row in a table.
The two combine. In a customer-facing demo you might have a highlight around the feature you're showing and a blur over the customer names in the sidebar, both active at once, both moving with the zooms. Tella's blur and highlight page shows them side by side.
Step 7: Check the export before you share
Scrub the finished video with the Effect timeline visible and watch only the blurred regions. Then check three moments:
- The first frame the data appears.
- Any frame where a zoom or layout change moves the region.
- The last frame before the data disappears.
If you're exporting an MP4 rather than sharing the hosted link, open the exported file and check again; the blur is rendered into the file, and the file is what ships. For the hosted link, the blur is part of playback and you can adjust it after sharing if you spot something.
Where blur can still fail
- Previews and tooltips. A blurred email address in a table can still be visible in a preview pane, a tooltip, or a browser tab title. Look for every place the value appears.
- The transcript. If you said the customer's name, blurring the screen doesn't remove it from the audio or the transcript. Cut the sentence, or re-record that line.
- The thumbnail. If you pick a frame or upload a custom thumbnail, make sure it isn't one where the data was visible before the blur started.
- Sharing scope. For internal videos with a lot of partially sensitive content, tighten viewer settings (workspace-only or password) rather than blurring fifty fields.
Related reading
- Blur or highlight part of the screen: the help center reference for every blur setting.
- Screen effects in Tella: zooms, cursors, blur, and highlight in one panel.
- How to blur on CapCut and how to blur a video in Canva, if the recording lives in another editor.
Try Tella free for 7 days and blur the next demo instead of re-recording it.